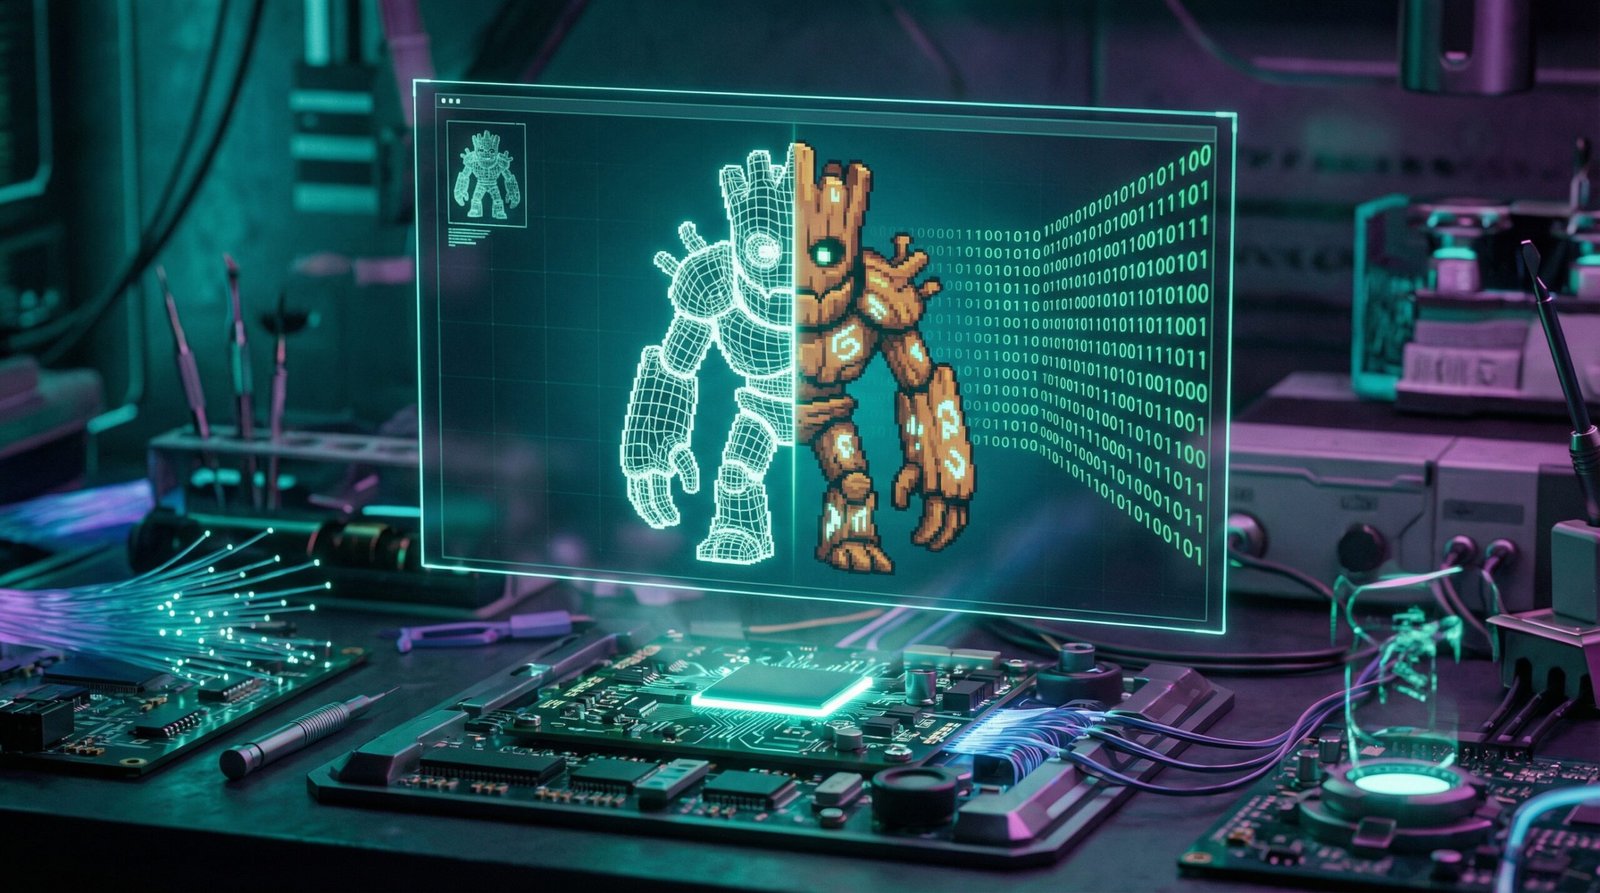
The “Programmer Art” Bottleneck
For independent developers, the logic is rarely the problem. The code executes. The physics engine hums. But the visuals? They usually consist of colored squares and placeholder capsules because the developer lacks the motor skills to draw a stick figure, let alone a ninja.
The traditional workflow requires hours of hand-drawing or digitizing sketches in Photoshop. It is a massive friction point that kills projects before they launch.
We are testing a different pipeline. Using Google’s latest vision capabilities (referred to here as the “Nano Banana Pro” model, likely a specific Gemini iteration), we are attempting to bypass the artistic manual labor entirely. The goal: Generate a full sprite sheet, environment, and enemies for a Unity 2D platformer, purely through prompt engineering and minor post-processing.
Here is the technical breakdown of the workflow.
Phase 1: Character Sprite Generation
The core asset is the protagonist. We are not asking for a single image; we need a functional sprite sheet with distinct states: Idle, Run, Jump, and Attack.
The Prompt Strategy:
You cannot simply ask for “a ninja.” You must define the mechanics of the image file.
- Input: A rough hand-drawn sketch of a ninja character (uploaded to the AI context window).
- Prompt Command: “Create a sprite sheet of this character with idle, run, jump, and attack states. 7 images per state. PNG format.”
The Friction Points & Fixes:
The AI output is visually impressive but technically flawed initially.
- Format Hallucination: The model may claim to generate a PNG with transparency but often delivers a JPEG with a solid background.
- Fix: Use an external tool like Pixelcut or Photopea. Do not rely on the LLM for alpha channels yet.
- Sprite Bleeding: The AI tends to bunch sprites too closely together. If you slice this in Unity, the arm of one frame will bleed into the leg of the next.
- Fix: Manual intervention. Open the sheet in Photopea (a browser-based Photoshop alternative). Manually lasso-select the sprites and space them out to ensure clean slicing borders.
Animation Refinement:
The initial “Run” cycle was anatomically incorrect (only one leg moved, resembling a limp rather than a sprint).
- Correction Prompt: “In the run state, the positions must be consecutive where both legs move fluidly.”
- Result: The model corrected the gait. It requires iterative prompting—do not accept the first batch if the physics look wrong.
Phase 2: Unity Implementation
Once the graphical assets are cleaned, the workflow shifts to the Unity engine.
Asset Import Settings:
- Import the cleanup up .png sprite sheet into your Assets/Sprites folder.
- In the Inspector, set Sprite Mode to Multiple.
- Set Filter Mode to Point (no filter) for crisp pixel edges.
- Open the Sprite Editor, select Slice, and choose Automatic or Grid by Cell Size depending on your spacing.
Physics & Animation Logic:
- Scene Setup: Drag the first “Idle” sprite into the scene to create a GameObject.
- Components:
- Add RigidBody2D (Set Collision Detection to Continuous for fast-moving objects).
- Add BoxCollider2D (Adjust bounds to fit the character model).
- Animator Controller:
- Create Animation Clips (Idle.anim, Run.anim, Jump.anim, Attack.anim).
- Drag the sliced sprites into their respective timelines.
- Transitions: Set up boolean parameters (e.g., isRunning, isGrounded). Link the states in the Animator window using these conditions.
Code Block: Basic Movement Logic
This script handles the velocity and state switching.
using UnityEngine;

public class PlayerController : MonoBehaviour
{
    private Rigidbody2D rb;
    private Animator anim;
    public float speed = 5f;
    public float jumpForce = 10f;
    private bool isGrounded;

    void Start()
    {
        rb = GetComponent<Rigidbody2D>();
        anim = GetComponent<Animator>();
    }

    void Update()
    {
        float moveInput = Input.GetAxisRaw("Horizontal");
        rb.velocity = new Vector2(moveInput * speed, rb.velocity.y);

        // Flip Sprite based on direction
        if (moveInput > 0) transform.localScale = new Vector3(1, 1, 1);
        else if (moveInput < 0) transform.localScale = new Vector3(-1, 1, 1);

        // Animation State
        anim.SetBool("isRunning", moveInput != 0);

        if (Input.GetButtonDown("Jump") && isGrounded)
        {
            rb.velocity = new Vector2(rb.velocity.x, jumpForce);
            anim.SetTrigger("takeOff");
        }
    }
}
A. Post Title
Devs Who Can’t Draw: Architecting a Playable 2D Platformer Using Google’s “Nano Banana Pro” Model
B. Post Content
The “Programmer Art” Bottleneck
For independent developers, the logic is rarely the problem. The code executes. The physics engine hums. But the visuals? They usually consist of colored squares and placeholder capsules because the developer lacks the motor skills to draw a stick figure, let alone a ninja.
The traditional workflow requires hours of hand-drawing or digitizing sketches in Photoshop. It is a massive friction point that kills projects before they launch.
We are testing a different pipeline. Using Google’s latest vision capabilities (referred to here as the “Nano Banana Pro” model, likely a specific Gemini iteration), we are attempting to bypass the artistic manual labor entirely. The goal: Generate a full sprite sheet, environment, and enemies for a Unity 2D platformer, purely through prompt engineering and minor post-processing.
Here is the technical breakdown of the workflow.
Phase 1: Character Sprite Generation
The core asset is the protagonist. We are not asking for a single image; we need a functional sprite sheet with distinct states: Idle, Run, Jump, and Attack.
The Prompt Strategy:
You cannot simply ask for “a ninja.” You must define the mechanics of the image file.
- Input: A rough hand-drawn sketch of a ninja character (uploaded to the AI context window).
- Prompt Command: “Create a sprite sheet of this character with idle, run, jump, and attack states. 7 images per state. PNG format.”
The Friction Points & Fixes:
The AI output is visually impressive but technically flawed initially.
- Format Hallucination: The model may claim to generate a PNG with transparency but often delivers a JPEG with a solid background.
- Fix: Use an external tool like Pixelcut or Photopea. Do not rely on the LLM for alpha channels yet.
- Sprite Bleeding: The AI tends to bunch sprites too closely together. If you slice this in Unity, the arm of one frame will bleed into the leg of the next.
- Fix: Manual intervention. Open the sheet in Photopea (a browser-based Photoshop alternative). Manually lasso-select the sprites and space them out to ensure clean slicing borders.
Animation Refinement:
The initial “Run” cycle was anatomically incorrect (only one leg moved, resembling a limp rather than a sprint).
- Correction Prompt: “In the run state, the positions must be consecutive where both legs move fluidly.”
- Result: The model corrected the gait. It requires iterative prompting—do not accept the first batch if the physics look wrong.
Phase 2: Unity Implementation
Once the graphical assets are cleaned, the workflow shifts to the Unity engine.
Asset Import Settings:
- Import the cleanup up .png sprite sheet into your Assets/Sprites folder.
- In the Inspector, set Sprite Mode to Multiple.
- Set Filter Mode to Point (no filter) for crisp pixel edges.
- Open the Sprite Editor, select Slice, and choose Automatic or Grid by Cell Size depending on your spacing.
Physics & Animation Logic:
- Scene Setup: Drag the first “Idle” sprite into the scene to create a GameObject.
- Components:
- Add RigidBody2D (Set Collision Detection to Continuous for fast-moving objects).
- Add BoxCollider2D (Adjust bounds to fit the character model).
- Animator Controller:
- Create Animation Clips (Idle.anim, Run.anim, Jump.anim, Attack.anim).
- Drag the sliced sprites into their respective timelines.
- Transitions: Set up boolean parameters (e.g., isRunning, isGrounded). Link the states in the Animator window using these conditions.
Code Block: Basic Movement Logic
This script handles the velocity and state switching. code C#
    using UnityEngine;

public class PlayerController : MonoBehaviour
{
    private Rigidbody2D rb;
    private Animator anim;
    public float speed = 5f;
    public float jumpForce = 10f;
    private bool isGrounded;

    void Start()
    {
        rb = GetComponent<Rigidbody2D>();
        anim = GetComponent<Animator>();
    }

    void Update()
    {
        float moveInput = Input.GetAxisRaw("Horizontal");
        rb.velocity = new Vector2(moveInput * speed, rb.velocity.y);

        // Flip Sprite based on direction
        if (moveInput > 0) transform.localScale = new Vector3(1, 1, 1);
        else if (moveInput < 0) transform.localScale = new Vector3(-1, 1, 1);

        // Animation State
        anim.SetBool("isRunning", moveInput != 0);

        if (Input.GetButtonDown("Jump") && isGrounded)
        {
            rb.velocity = new Vector2(rb.velocity.x, jumpForce);
            anim.SetTrigger("takeOff");
        }
    }
}
Phase 3: Infinite Backgrounds & Parallax
Static backgrounds kill immersion. We need a seamless loop.
The Prompt:
“Panoramic anime style blue mountains landscape, flat vector art, cel shaded… seamless horizontal tiling, infinite loop background, left side matches right side perfectly.”
The Result:
The AI struggled initially but eventually produced a mountain range where the pixel data on the far right (x_max) perfectly aligned with the far left (x_min).
Unity Implementation:
- Import the background asset.
- Duplicate the background object three times.
- Place them side-by-side.
- Parent them to the Camera or use a Parallax script to move them slower than the foreground for depth.
Phase 4: The Tileset Challenge
This is the most difficult asset to generate. A tileset requires strict grid adherence for ground, corners, and floating platforms.
The Workflow:
- Prompt: “Generate a tileset for my 2D game… pieces must fit together to form platforms… style matches the snowy mountain background.”
- Visual Output: The AI generated a “sheet” of ground textures, but not a perfect grid. It provided ice blocks, dirt corners, and floating platforms.
- Cleanup: Extensive use of Photopea was required here. You must manually cut the distinct blocks (corners, centers, edges) and align them to a grid (e.g., 16×16 or 32×32 pixels).
- Tile Palette:
- In Unity, go to Window > 2D > Tile Palette.
- Create a new Palette.
- Drag the sliced tiles in.
- Paint the level onto a Tilemap grid.
Phase 5: Enemy Logic
To test combat, we generated a “Wolf-Dragon Hybrid” enemy.
Prompting for Aggression:
Just like the player, we requested specific states: Idle and Attack. The AI generated a sequence where the creature lunges.
Damage Logic:
We implemented a simple hitbox system.
void OnTriggerEnter2D(Collider2D other)
{
    if(other.CompareTag("Enemy"))
    {
        // Check if player is attacking state
        if(anim.GetCurrentAnimatorStateInfo(0).IsName("Attack"))
        {
            Destroy(other.gameObject); // Kill Enemy
        }
        else
        {
            // Player takes damage
            TakeDamage();
        }
    }
}
A. Post Title
Devs Who Can’t Draw: Architecting a Playable 2D Platformer Using Google’s “Nano Banana Pro” Model
B. Post Content
The “Programmer Art” Bottleneck
For independent developers, the logic is rarely the problem. The code executes. The physics engine hums. But the visuals? They usually consist of colored squares and placeholder capsules because the developer lacks the motor skills to draw a stick figure, let alone a ninja.
The traditional workflow requires hours of hand-drawing or digitizing sketches in Photoshop. It is a massive friction point that kills projects before they launch.
We are testing a different pipeline. Using Google’s latest vision capabilities (referred to here as the “Nano Banana Pro” model, likely a specific Gemini iteration), we are attempting to bypass the artistic manual labor entirely. The goal: Generate a full sprite sheet, environment, and enemies for a Unity 2D platformer, purely through prompt engineering and minor post-processing.
Here is the technical breakdown of the workflow.
Phase 1: Character Sprite Generation
The core asset is the protagonist. We are not asking for a single image; we need a functional sprite sheet with distinct states: Idle, Run, Jump, and Attack.
The Prompt Strategy:
You cannot simply ask for “a ninja.” You must define the mechanics of the image file.
- Input: A rough hand-drawn sketch of a ninja character (uploaded to the AI context window).
- Prompt Command: “Create a sprite sheet of this character with idle, run, jump, and attack states. 7 images per state. PNG format.”
The Friction Points & Fixes:
The AI output is visually impressive but technically flawed initially.
- Format Hallucination: The model may claim to generate a PNG with transparency but often delivers a JPEG with a solid background.
- Fix: Use an external tool like Pixelcut or Photopea. Do not rely on the LLM for alpha channels yet.
- Sprite Bleeding: The AI tends to bunch sprites too closely together. If you slice this in Unity, the arm of one frame will bleed into the leg of the next.
- Fix: Manual intervention. Open the sheet in Photopea (a browser-based Photoshop alternative). Manually lasso-select the sprites and space them out to ensure clean slicing borders.
Animation Refinement:
The initial “Run” cycle was anatomically incorrect (only one leg moved, resembling a limp rather than a sprint).
- Correction Prompt: “In the run state, the positions must be consecutive where both legs move fluidly.”
- Result: The model corrected the gait. It requires iterative prompting—do not accept the first batch if the physics look wrong.
Phase 2: Unity Implementation
Once the graphical assets are cleaned, the workflow shifts to the Unity engine.
Asset Import Settings:
- Import the cleanup up .png sprite sheet into your Assets/Sprites folder.
- In the Inspector, set Sprite Mode to Multiple.
- Set Filter Mode to Point (no filter) for crisp pixel edges.
- Open the Sprite Editor, select Slice, and choose Automatic or Grid by Cell Size depending on your spacing.
Physics & Animation Logic:
- Scene Setup: Drag the first “Idle” sprite into the scene to create a GameObject.
- Components:
- Add RigidBody2D (Set Collision Detection to Continuous for fast-moving objects).
- Add BoxCollider2D (Adjust bounds to fit the character model).
- Animator Controller:
- Create Animation Clips (Idle.anim, Run.anim, Jump.anim, Attack.anim).
- Drag the sliced sprites into their respective timelines.
- Transitions: Set up boolean parameters (e.g., isRunning, isGrounded). Link the states in the Animator window using these conditions.
Code Block: Basic Movement Logic
This script handles the velocity and state switching. code C#
    using UnityEngine;

public class PlayerController : MonoBehaviour
{
    private Rigidbody2D rb;
    private Animator anim;
    public float speed = 5f;
    public float jumpForce = 10f;
    private bool isGrounded;

    void Start()
    {
        rb = GetComponent<Rigidbody2D>();
        anim = GetComponent<Animator>();
    }

    void Update()
    {
        float moveInput = Input.GetAxisRaw("Horizontal");
        rb.velocity = new Vector2(moveInput * speed, rb.velocity.y);

        // Flip Sprite based on direction
        if (moveInput > 0) transform.localScale = new Vector3(1, 1, 1);
        else if (moveInput < 0) transform.localScale = new Vector3(-1, 1, 1);

        // Animation State
        anim.SetBool("isRunning", moveInput != 0);

        if (Input.GetButtonDown("Jump") && isGrounded)
        {
            rb.velocity = new Vector2(rb.velocity.x, jumpForce);
            anim.SetTrigger("takeOff");
        }
    }
}
Phase 3: Infinite Backgrounds & Parallax
Static backgrounds kill immersion. We need a seamless loop.
The Prompt:
“Panoramic anime style blue mountains landscape, flat vector art, cel shaded… seamless horizontal tiling, infinite loop background, left side matches right side perfectly.”
The Result:
The AI struggled initially but eventually produced a mountain range where the pixel data on the far right (x_max) perfectly aligned with the far left (x_min).
Unity Implementation:
- Import the background asset.
- Duplicate the background object three times.
- Place them side-by-side.
- Parent them to the Camera or use a Parallax script to move them slower than the foreground for depth.
Phase 4: The Tileset Challenge
This is the most difficult asset to generate. A tileset requires strict grid adherence for ground, corners, and floating platforms.
The Workflow:
- Prompt: “Generate a tileset for my 2D game… pieces must fit together to form platforms… style matches the snowy mountain background.”
- Visual Output: The AI generated a “sheet” of ground textures, but not a perfect grid. It provided ice blocks, dirt corners, and floating platforms.
- Cleanup: Extensive use of Photopea was required here. You must manually cut the distinct blocks (corners, centers, edges) and align them to a grid (e.g., 16×16 or 32×32 pixels).
- Tile Palette:
- In Unity, go to Window > 2D > Tile Palette.
- Create a new Palette.
- Drag the sliced tiles in.
- Paint the level onto a Tilemap grid.
Phase 5: Enemy Logic
To test combat, we generated a “Wolf-Dragon Hybrid” enemy.
Prompting for Aggression:
Just like the player, we requested specific states: Idle and Attack. The AI generated a sequence where the creature lunges.
Damage Logic:
We implemented a simple hitbox system. code C#
    void OnTriggerEnter2D(Collider2D other)
{
    if(other.CompareTag("Enemy"))
    {
        // Check if player is attacking state
        if(anim.GetCurrentAnimatorStateInfo(0).IsName("Attack"))
        {
            Destroy(other.gameObject); // Kill Enemy
        }
        else
        {
            // Player takes damage
            TakeDamage();
        }
    }
}
The Verdict
Is “Nano Banana Pro” (Gemini) ready for production game dev?
The Good:
- Ideation Speed: Reduced character design time from days to minutes.
- Style Consistency: Able to match the background aesthetic to the tileset aesthetic via prompts.
- Animation Fluidity: Surprisingly capable of understanding kinematics (running legs, sword swings) after refinement prompts.
The Bad:
- Formatting: It cannot natively output game-ready, transparent PNGs on a perfect grid.
- Manual Labor: You still need an image editor (Photoshop/Photopea) to fix spacing and remove artifacts.
This technology does not replace the artist. However, for the programmer who has zero artistic capability, it converts an idea into a playable prototype in under an hour. That is significant leverage.